Mezuzah Cookies

Some hit the big time with a chart-topping song, a TED Talk, or a breakout role on the big screen. For me, it was…mezuzah cookies. As in, I peaked with cookies shaped like religious door hardware. Against all odds, these remain my most widely shared, widely DM’d about creation, hitting an emotional nerve I still don’t fully understand, and pulling me into a bewildering niche I can no longer escape without disappointing an entire JCC.
But I’ve made my peace with it. because Mezuzah Cookies really do seem to unite the Jewish people in a rare, almost messianic harmony. I’ve since made them for our own housewarmings and house-coolings, I’ve given them as gifts… They are always a hit.
I like to break down the process into three days: On the first day, I bake the cookies. On the second day, I make royal icing and add decorations, then let it all harden overnight. On the third day, I pipe the Shins. (On the fourth day, I look upon all that I have made, and behold—it’s very cute.)
The key here is using a fork for the Shin—just a gentle upward drag gives you that signature flourish. Once you nail one, you’ll feel unstoppable. And you can take my word for it: A well-piped Shin might change your life.
Mezuzah Cookies
Makes about 30 cookies
1 batch Classic Sugar Cookie dough (below)—rolled out into a rectangle shape, chilled on parchment paper, and ready to cut
1/2 batch prepared Essential Royal Icing (below)
1/2 cup semisweet chocolate chips
Assorted sprinkles, sanding sugar, or other decorative toppings
Make the cookies: Using a ruler and a pizza cutter or paring knife (or a 4½-by-1-inch rectangular cookie cutter), cut the chilled, rolled dough into as many 4½-by-1-inch rectangles as possible, rerolling scraps as needed. Arrange the rectangles on a parchment paper–lined baking sheet and chill for at least 15 minutes. Then, bake for 10 to 13 minutes, or until the edges are golden. Let cool completely before decorating.
Transfer the prepared royal icing into a piping bag or zip-top bag with a very small corner snipped off. To decorate, first outline the edge of each cooled cookie with white icing to create a border—this helps contain the icing and prevents it from trickling over the edges. Then fill (or “flood”) the inside of the cookie with more icing, using the back of a small spoon to gently spread it to the edges as needed. While the icing is still very wet, add any decorative details, like sprinkles or sanding sugar. Let set until fully dry, at least 12 hours or overnight.
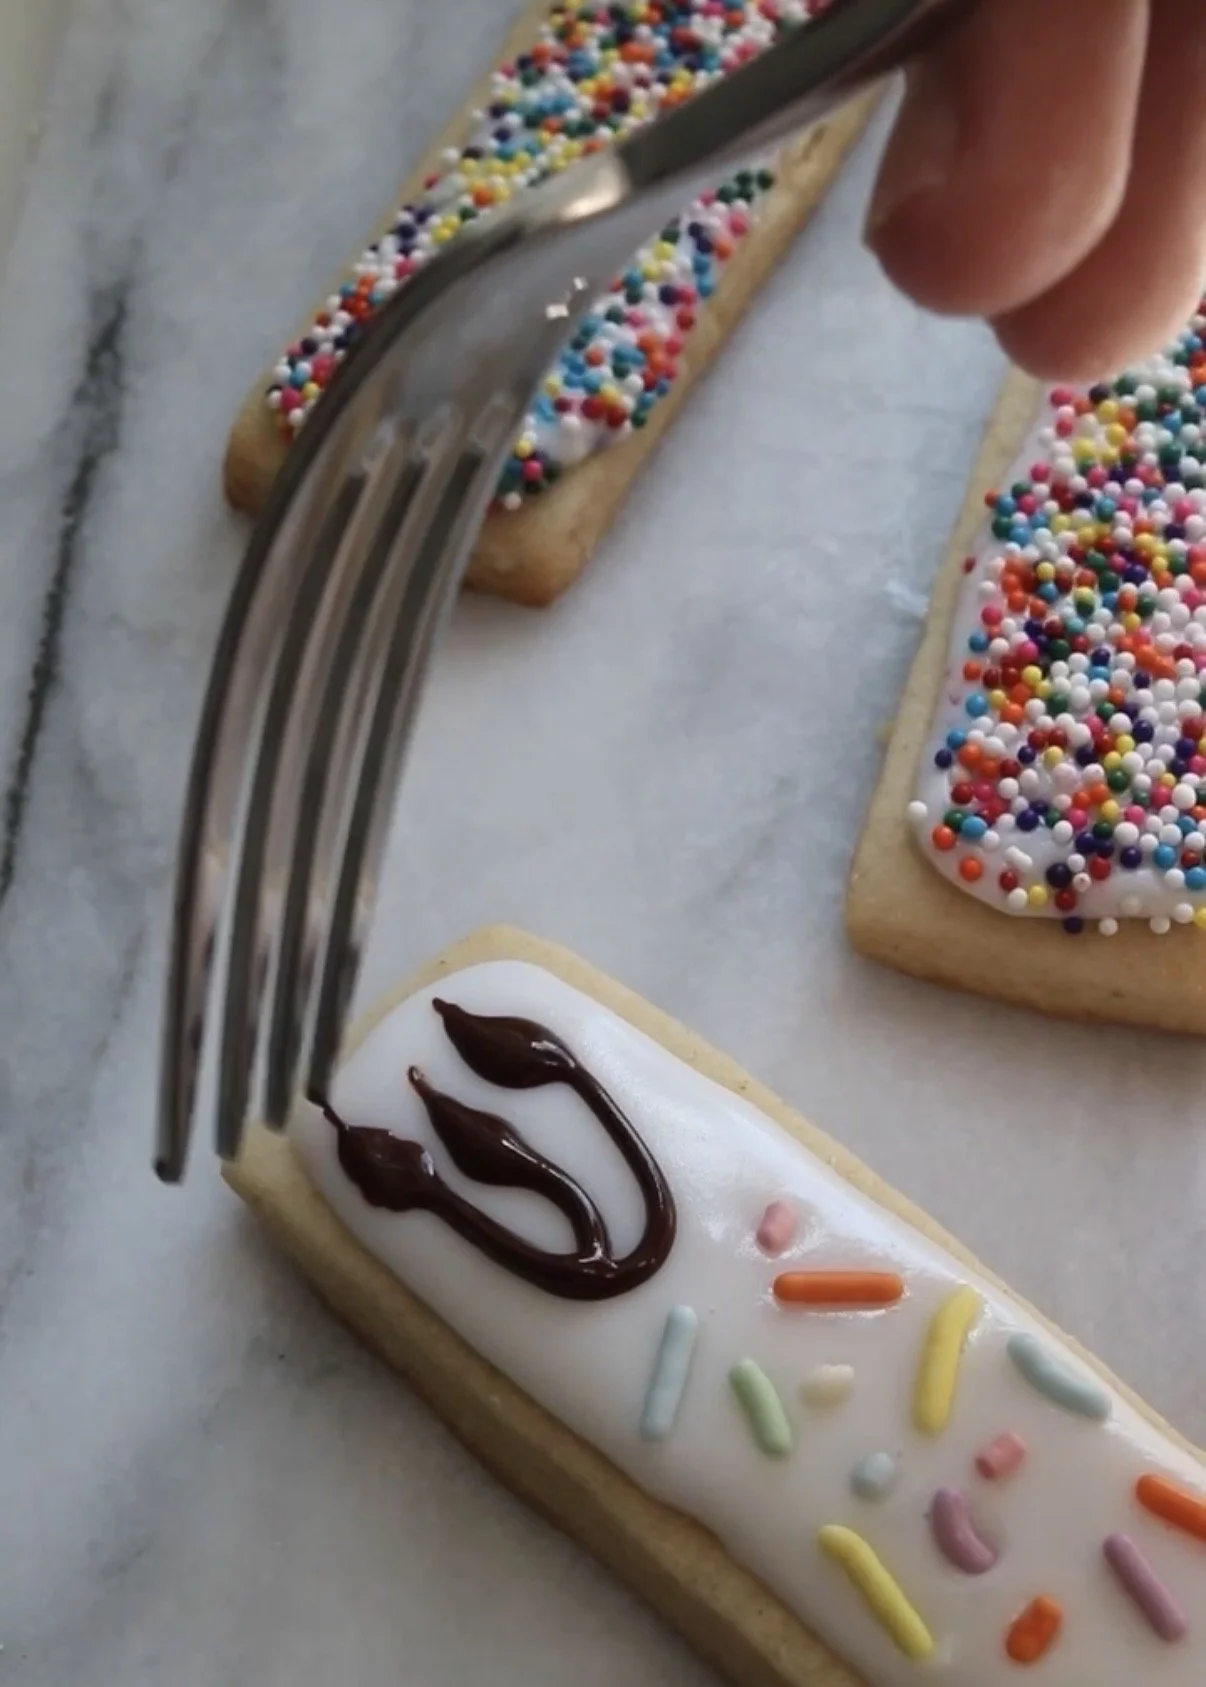
Make the Shin: Place the chocolate chips into a microwave-safe bowl and heat in 20-second intervals, stirring between each, until mostly melted. (Once nearly melted, switch to 10-second intervals to prevent scorching.) Transfer the melted chocolate into a piping bag or zip-top bag with a very small corner snipped off. For the best results, practice piping on parchment paper or scrap paper first. Then carefully pipe a Shin onto each cookie—I find it’s easiest to start with a “U” shape, then add the center line. While the chocolate is still wet, gently press the tines of a fork into the top of each prong to widen it slightly, then pull upward to create the signature pointed tips. Let the cookies dry completely for at least 2 hours before serving.
The baked cookies will keep, covered, at room temperature for up to 5 days. The dough can be wrapped well and frozen for up to 2 months; thaw overnight in the refrigerator before using. The undecorated baked cookies freeze beautifully; fully decorated royal icing cookies can technically be frozen, but because of the added chocolate Shin detail, I wouldn’t recommend it here—it’s too delicate when thawed.
Classic Sugar Cookies
Makes twenty 3-inch round cookies or about thirty Mezuzah Cookies
21/2 cups (325g) all-purpose flour, plus more for rolling
1/2 teaspoon (2g) baking powder
1 teaspoon (3g) Diamond Crystal kosher salt
11/2 sticks (3/4 cup / 170g) unsalted butter, softened
3/4 cup (150g) granulated sugar
1 large egg, at room temperature
2 teaspoons (10g) pure vanilla extract
In a medium bowl, whisk together the flour, baking powder, and salt; set aside. In the bowl of a stand mixer fitted with the paddle attachment, cream the butter and granulated sugar on medium-high speed until light and fluffy, 2 to 3 minutes. Add the egg and vanilla and beat on medium speed until well combined, scraping down the sides of the bowl as needed.
Add the flour mixture in two parts, beating on low speed between each addition just until no floury spots remain. Scrape down the bowl and fold once or twice to make sure everything is well combined. Then separate the dough into two portions, shape each into a disc (or into a rectangle if you’re making my Mezuzah Cookies on page 000) about 1/2 inch thick, and place each on a lightly floured sheet of parchment paper.
Dust the tops of the dough with more flour, place another sheet of parchment paper on top, then roll each portion out to be a scant 1/4 inch thick. Transfer each sheet of parchment paper to a half-sheet pan, cover with plastic wrap, and refrigerate for at least 2 hours. (If you only have one pan available or need to save space in the fridge, you can stack the sheets of dough with parchment paper in between.)
Preheat the oven to 350°F.
Cut the chilled dough into shapes using your cookie cutters of choice. Gather the scraps, reroll the dough, and cut out one more batch; discard the excess dough. Arrange the cookies on the baking sheets, reusing the parchment paper from earlier (dust off any excess flour first), and refrigerate again for at least 30 minutes until firm to the touch.
Bake for 10 to 13 minutes, or until the edges are lightly browned and the tops are just set. Let cool for a few minutes on the baking sheets, then transfer to wire racks to cool completely. Decorate and serve.
The baked cookies will keep, covered, at room temperature for up to 5 days. The dough can be wrapped well and frozen for up to 2 months; thaw overnight in the refrigerator before using.
Essential Royal Icing
Makes about 3 cups
4 cups (480g) confectioners’ sugar, sifted (sift after measuring), plus more as needed
3 tablespoons (30g) meringue powder
1/2 cup (120mL) water, plus more as needed
Gel-based food coloring, for tinting (optional)
In the bowl of a stand mixer fitted with the paddle attachment, mix the confectioners’ sugar, meringue powder, and water on low speed until just combined. Increase the mixer speed to medium-high and beat until the icing is completely smooth and falls from the paddle in loose ribbons, 4 to 5 minutes.
For a thicker consistency (ideal for piping borders and detailed designs), sift in additional confectioners’ sugar, 1 tablespoon at a time, beating after each addition. For a thinner consistency (better for flooding cookies and creating smooth surfaces), add more water, 1 teaspoon at a time, mixing each new addition until combined before adding more. To tint the icing, mix in gel-based food coloring one drop at a time until the color is evenly distributed.
To store, transfer the icing to an airtight container and refrigerate for up to 1 week; bring to room temperature before using.